VendorVault Developer Guide
Acknowledgements
{ list here sources of all reused/adapted ideas, code, documentation, and third-party libraries -- include links to the original source as well }
Setting up, getting started
Refer to the guide Setting up and getting started.
Design
Architecture
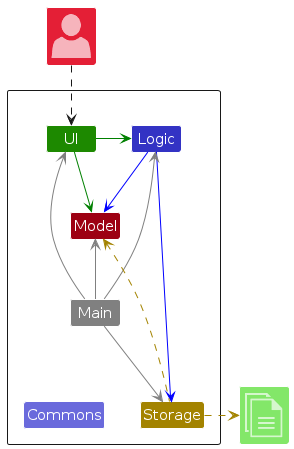
The Architecture Diagram given above explains the high-level design of the App.
Given below is a quick overview of main components and how they interact with each other.
Main components of the architecture
Main (consisting of classes Main and MainApp) is in charge of the app launch and shut down.
- At app launch, it initializes the other components in the correct sequence, and connects them up with each other.
- At shut down, it shuts down the other components and invokes cleanup methods where necessary.
The bulk of the app's work is done by the following four components:
UI: The UI of the App.Logic: The command executor.Model: Holds the data of the App in memory.Storage: Reads data from, and writes data to, the hard disk.
Commons represents a collection of classes used by multiple other components.
How the architecture components interact with each other
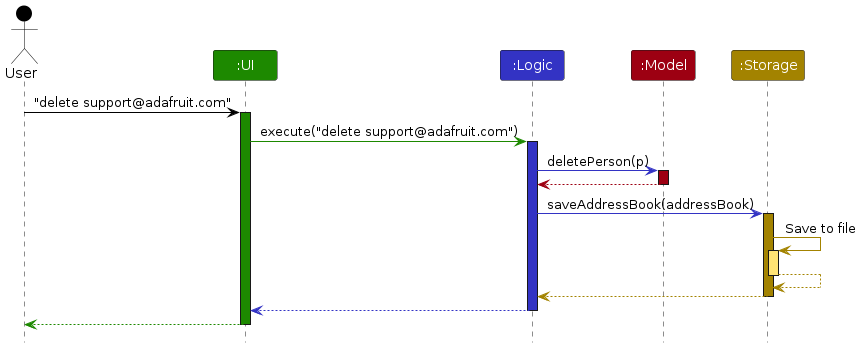
The Sequence Diagram below shows how the components interact with each other for the scenario where the user issues the command delete support@adafruit.com.
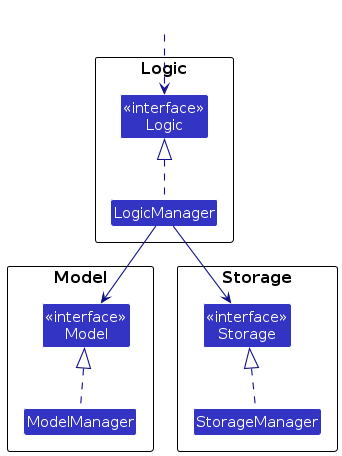
Each of the four main components (also shown in the diagram above),
- defines its API in an
interfacewith the same name as the Component. - implements its functionality using a concrete
{Component Name}Managerclass
For example, the Logic component defines its API in the Logic.java interface and implements its functionality using the LogicManager.java class which follows the Logic interface. Other components interact with a given component through its interface rather than the concrete class, as illustrated below.
The sections below give more details of each component.
UI component
The API of this component is specified in Ui.java
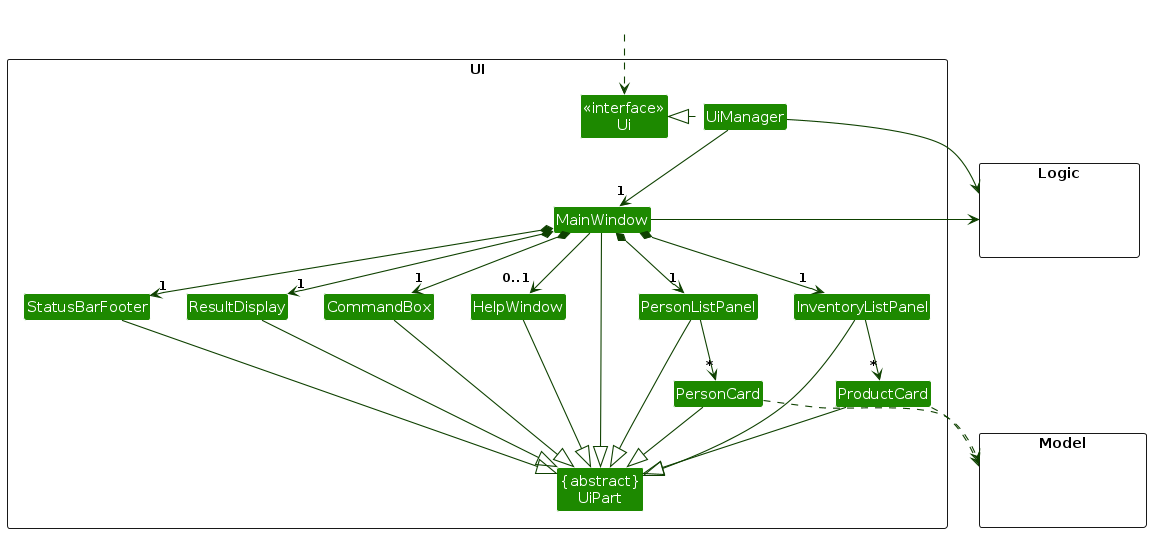
The UI consists of a MainWindow that is made up of parts e.g.CommandBox, ResultDisplay, PersonListPanel, StatusBarFooter etc. All these, including the MainWindow, inherit from the abstract UiPart class which captures the commonalities between classes that represent parts of the visible GUI.
The UI component uses the JavaFx UI framework. The layout of these UI parts are defined in matching .fxml files that are in the src/main/resources/view folder. For example, the layout of the MainWindow is specified in MainWindow.fxml
The UI component
- executes user commands using the
Logiccomponent. - listens for changes to
Modeldata so that the UI can be updated with the modified data. - keeps a reference to the
Logiccomponent, because theUIrelies on theLogicto execute commands. - depends on some classes in the
Modelcomponent, as it displaysPersonobject residing in theModel.
Logic component
API : Logic.java
Here's a (partial) class diagram of the Logic component:

The sequence diagram below illustrates the interactions within the Logic component, taking execute("delete support@adafruit.com") API call as an example.
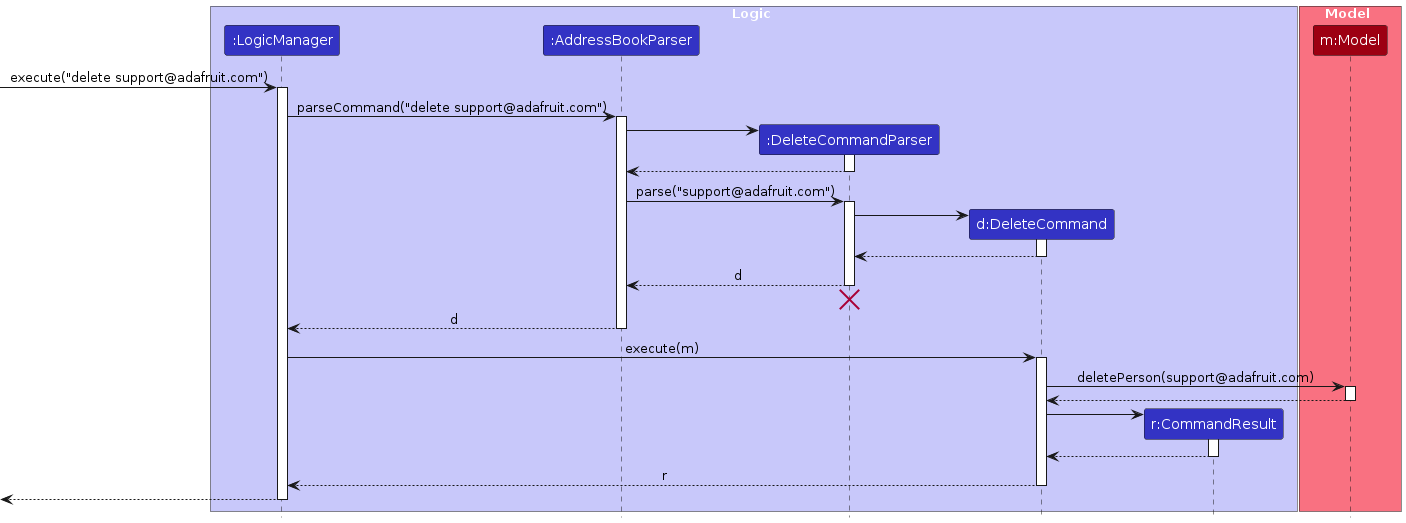
Note: The lifeline for DeleteCommandParser should end at the destroy marker (X) but due to a limitation of PlantUML, the lifeline continues till the end of diagram.
How the Logic component works:
- When
Logicis called upon to execute a command, it is passed to anAddressBookParserobject which in turn creates a parser that matches the command (e.g.,DeleteCommandParser) and uses it to parse the command. - This results in a
Commandobject (more precisely, an object of one of its subclasses e.g.,DeleteCommand) which is executed by theLogicManager. - The command can communicate with the
Modelwhen it is executed (e.g. to delete a person).
Note that although this is shown as a single step in the diagram above (for simplicity), in the code it can take several interactions (between the command object and theModel) to achieve. - The result of the command execution is encapsulated as a
CommandResultobject which is returned back fromLogic.
Here are the other classes in Logic (omitted from the class diagram above) that are used for parsing a user command:
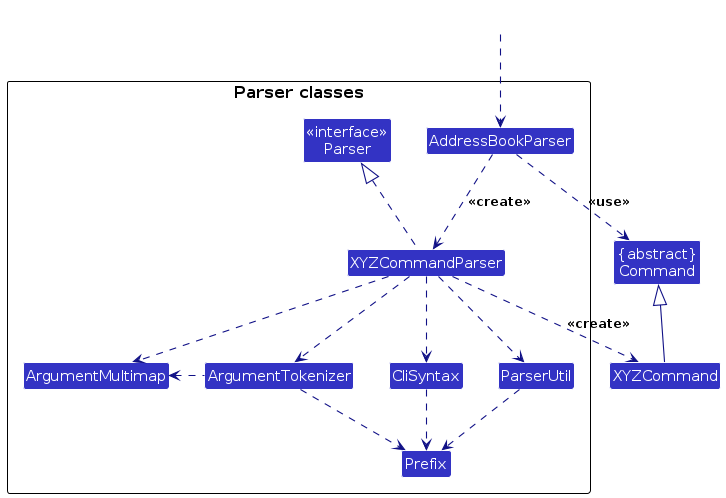
How the parsing works:
- When called upon to parse a user command, the
AddressBookParserclass creates anXYZCommandParser(XYZis a placeholder for the specific command name e.g.,AddCommandParser) which uses the other classes shown above to parse the user command and create aXYZCommandobject (e.g.,AddCommand) which theAddressBookParserreturns back as aCommandobject. - All
XYZCommandParserclasses (e.g.,AddCommandParser,DeleteCommandParser, ...) inherit from theParserinterface so that they can be treated similarly where possible e.g, during testing. - Some commands like
addsupport warnings which are generated at 2 levels:- Parsing Warnings (e.g. invalid email format) are generated by the
Parserand returned within theParseResultobject. - Duplicate Warnings (e.g. similar existing contact) are generated by the
Modelcomponents'sfindSimilarXYZMatchmethods (e.g.Model#findSimilarNameMatch) and returned within theCommandResultobject.
- Parsing Warnings (e.g. invalid email format) are generated by the
Model component
API : Model.java
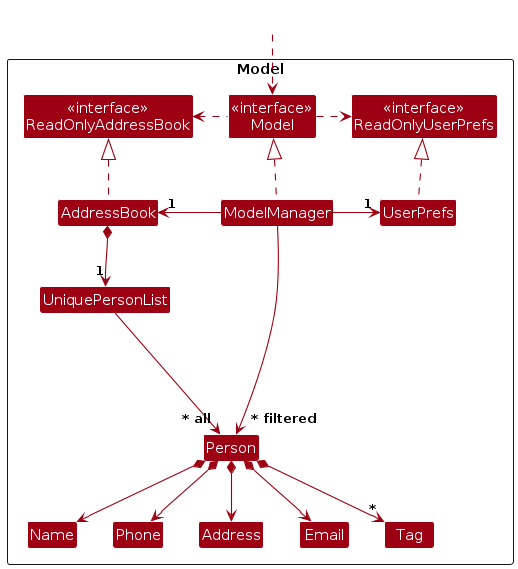
The Model component
- stores vendor contact data i.e., all
Personobjects (which are contained in aUniquePersonListobject). - stores inventory data i.e., all
Productobjects (which are contained in aUniqueProductListobject). - stores the current set of
Person/Productobjects as a separate filtered list which is exposed as an unmodifiableObservableList<Person>/ObservableList<Product>. - stores a
VersionedVendorVaultobject that represents the current state of the address book and inventory data, and supports undo/redo operations on it. - stores alias data i.e., all
Aliasobjects (which are contained in aAliasListobject). - stores a
UserPrefobject that represents the user’s preferences. This is exposed as aReadOnlyUserPrefobject. - does not depend on any of the other three components.
Archived records are kept in the same data structures rather than moved to a separate list:
- A
Personis considered archived when its tag set contains the reserved"archived"tag.Person#archive()/Person#restore()return new immutable copies with the tag added or removed. - A
Productcarries a dedicatedboolean isArchivedfield.Product#archive()/Product#restore()return new immutable copies with the flag toggled.
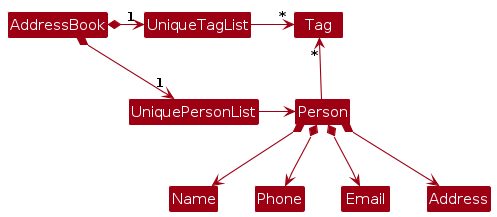
Note: An alternative (arguably, a more OOP) model is given below. It has a Tag list in the AddressBook, which Person references. This allows AddressBook to only require one Tag object per unique tag, instead of each Person needing their own Tag objects.
Storage component
API : Storage.java
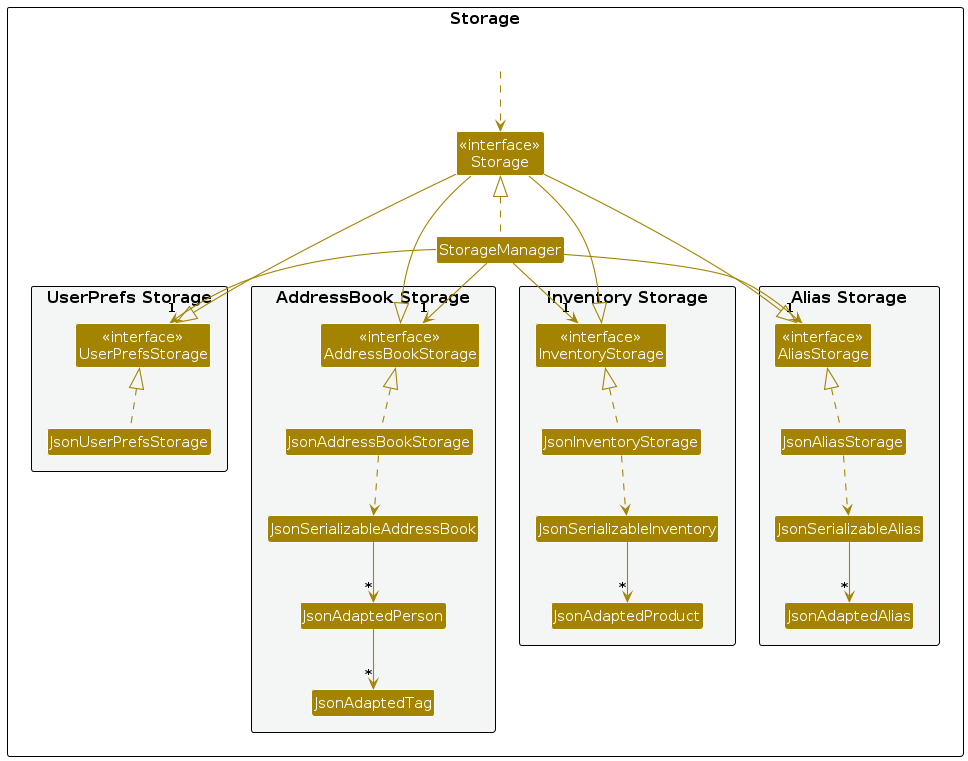
The Storage component
- saves contact, inventory, alias and user preference data in JSON format, and reads them back into corresponding objects.
- inherits from
AddressBookStorage,InventoryStorage,AliasStorageandUserPrefStorage - depends on some classes in the
Modelcomponent (because theStoragecomponent's job is to save/retrieve objects that belong to theModel)
Common classes
Classes used by multiple components are in the seedu.address.commons package.
Implementation
This section describes some noteworthy details on how certain features are implemented.
Undo and Redo feature
Implementation
The undo/redo mechanism is facilitated by VersionedVendorVault. It extends VendorVault with an undo/redo history, stored internally as an vendorVaultStateList, stateActionSummaryList and currentStatePointer. Additionally, it implements the following operations:
VersionedVendorVault#commit(currentState, actionSummary)— Saves the current VendorVault state in its history along with a summary of the action that caused the change.VersionedVendorVault#undo(currentState)— Restores the previous VendorVault state from its history.VersionedVendorVault#redo(currentState)— Restores a previously undone VendorVault state from its history.VersionedVendorVault#canUndo()andVersionedVendorVault#canRedo()— Checks if undo/redo operations are possible based on the current state of the history.
Note: VendorVault stores both address book and inventory data as a single state. Even if only one is modified, the entire VendorVault state is saved, enabling a single undo/redo mechanism.
These operations are exposed in the Model interface as Model#commitVendorVault(), Model#undoVendorVault(), Model#redoVendorVault(), Model#canUndoVendorVault() and Model#canRedoVendorVault() respectively.
Usage Scenario
Given below is an example showing how the undo/redo mechanism behaves at each step.
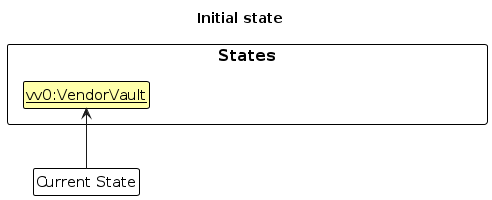
Step 1. The user launches the application for the first time. VersionedVendorVault is initialized with the initial VendorVault state (which includes the address book and inventory internally), and the currentStatePointer points to that state.
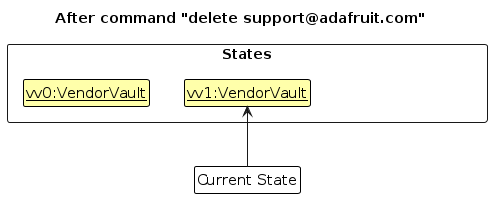
Step 2. The user executes delete support@adafruit.com command. The delete command calls Model#commitVendorVault(), saving the modified VendorVault state to vendorVaultStateList and moving the currentStatePointer to point to the newly inserted state.
Step 3. The user executes add n/Adafruit … to add a new vendor contact. The add command also calls Model#commitVendorVault(), saving another modified VendorVault state the vendorVaultStateList.
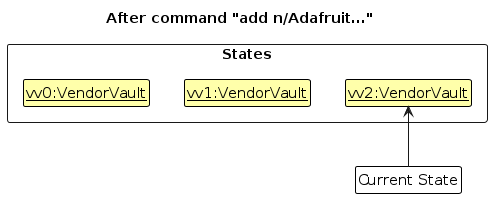
Note: If a command fails its execution, it will not call Model#commitVendorVault(), so the state will not be saved into the vendorVaultStateList.
Step 4. The user now decides that adding the contact was a mistake, and decides to undo that action by executing the undo command. The undo command will call Model#undoVendorVault(), which will shift the currentStatePointer once to the left, pointing it to the previous state, and restores VendorVault's data to that state. The action summary is also retrieved from stateActionSummaryList and returned to the user as part of the CommandResult's feedback message.

Note: If the currentStatePointer is at index 0 (the initial state), there is no previous state to restore. The undo command checks this using Model#canundoVendorVault() and returns an error if undo is not possible.
The following sequence diagram shows how an undo operation goes through the Logic component:
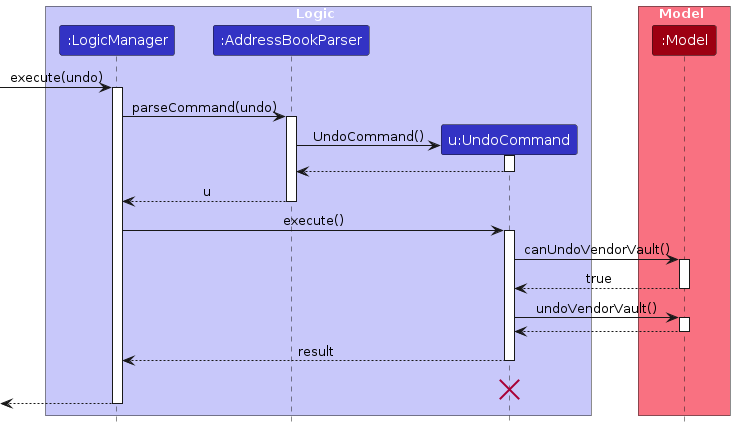
Note: The lifeline for UndoCommand should end at the destroy marker (X) but due to a limitation of PlantUML, the lifeline reaches the end of diagram.
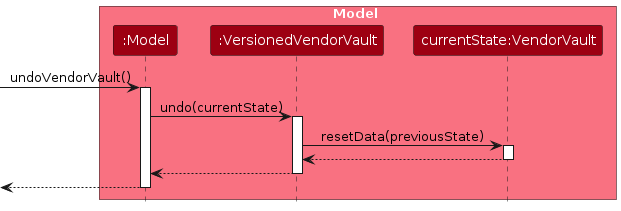
Similarly, how an undo operation goes through the Model component is shown below:
The redo command does the opposite — it calls Model#redoVendorVault(), which shifts the currentStatePointer once to the right, pointing to the previously undone state, and restores the VendorVault to that state.
Note: If the currentStatePointer is at index vendorVaultStateList.size() - 1 (the latest state), there is no undone states to redo. The redo command checks this using Model#canRedoVendorVault() and returns an error if redo is not possible.
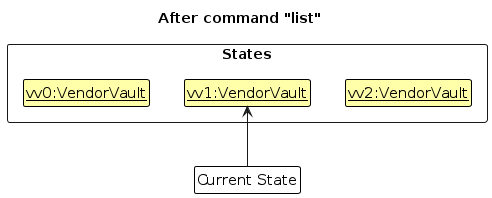
Step 5. The user then executes the list command. Commands that do not modify state,such as list, will not call Model#commitVendorVault(), Model#undoVendorVault() or Model#redoVendorVault(). Thus, the vendorVaultStateList remains unchanged.
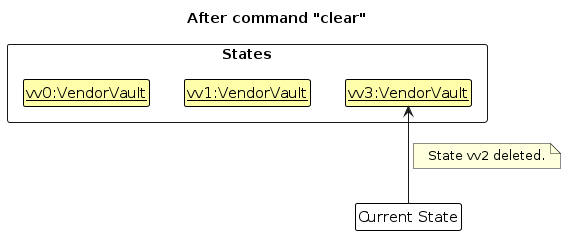
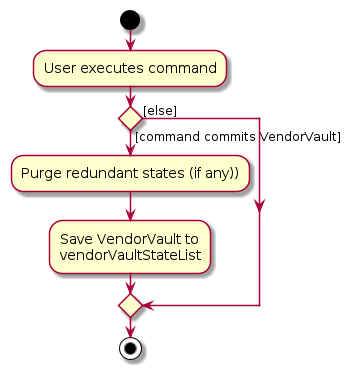
Step 6. The user executes clear, which calls Model#commitVendorVault(). Since the currentStatePointer is not pointing at the end of the vendorVaultStateList, all VendorVault states after the currentStatePointer will be purged. Reason: It no longer makes sense to redo the add n/Adafruit … command. This is the behavior that most modern desktop applications follow.
The following activity diagram summarizes what happens when a user executes a new command:
Design considerations:
Aspect: How undo & redo executes:
Alternative 1 (current choice): Saves the entire current state.
- Pros: Easy to implement and supports future commands.
- Cons: May have performance issues in terms of memory usage.
Alternative 2: Individual command knows how to undo/redo. itself.
- Pros: Will use less memory (e.g. for
delete, just save the person being deleted). - Cons: We must ensure that the implementation of each individual command and future commands are correct.
- Pros: Will use less memory (e.g. for
Given that VendorVault’s data size is expected to remain relatively small (e.g. about 1,000 contacts and 5,000 products) and undoable actions are typicallyoccur in small batches, the memory overhead of storing snapshots is acceptable.
Aspect: Granularity of undo/redo scope:
Alternative 1 (current choice): Single unified VendorVault snapshot per commit.
- Pros: Simple and consistent, where each undo reverses exactly one user action, whether it affects contacts, products, or both.
- Cons: Stores the full inventory even when only contacts change, increasing memory usage.
Alternative 2: Separate versioned histories for AddressBook and Inventory.
- Pros: More memory-efficient with finer-grained snapshots.
- Cons: Much more complex. Actions affecting both must commit atomically, and undo must keep both histories synchronised, increasing desynchronisation risk.
Similarly, the extra memory cost is acceptable in exchange for simpler, more reliable undo behaviour.
Aspect: Where the commit is triggered:
Alternative 1 (current choice): Each command calls
Model#commitVendorVault()itself.- Pros: Commands have full control; read-only commands (e.g., list, find) can skip committing.
- Cons: Future command implementors must remember to call commit.
Alternative 2:
LogicManagercommits automatically after every successful command.- Pros: Centralises commit logic.
- Cons: Read-only commands would create unnecessary snapshots unless explicitly excluded, requiring extra flags or interfaces.
We chose Alternative 1 to give commands explicit control, avoid unnecessary snapshots, and keep the undo history meaningful.
Command History Feature
Implementation
The command history feature is implemented using a CommandHistory class that maintains a list of previously executed commands. Each time a command is executed, it is added to the CommandHistory. Additionally, it implements the following operations:
CommandHistory#add(String commandText)— Adds a command as a string to the history.CommandHistory#getPrevious(String currentInput)— Returns the previous command in the history.CommandHistory#getNext(String currentInput)— Returns the next command in the history.CommandHistory#resetNavigation()— Resets the navigation pointer to the end of the history.
These operations are exposed through Logic#addCommandHistory(String), Logic#getPrevCommandHistory(String), and Logic#getNextCommandHistory(String), allowing the UI to navigate command history via the Logic API without directly depending on CommandHistory.
The following class diagram summarizes the structure and relationships used by this feature:

Usage Scenario
Given below is an example usage scenario and how the command history behaves at each step.
Step 1. The user executes the command add n/Adafruit Industries.... The command is executed and added to the CommandHistory.
Note: Commands are added to the CommandHistory only if they execute successfully. This includes commands whose execution produces warnings.
Step 2. The user executes the command delete support@adafruit.com. The command is executed and added to the CommandHistory.
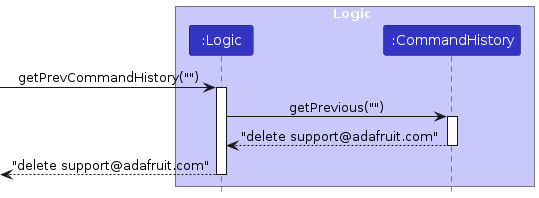
Step 3. The user presses the UP arrow key to navigate to the previous command. The CommandHistory#getPrevious() method is called with the current input (empty in this case). The command box is then updated with the previous command delete support@adafruit.com.
The following sequence diagram shows how the getPrevious operation works as described:

Similarly, how the getPrevCommandHistory operation goes through Logic component is shown below:
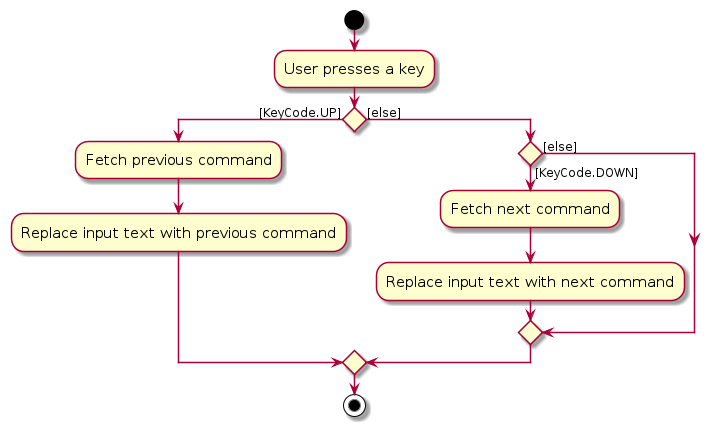
The following activity diagram below summarizes how key presses are handled to navigate through the command history:
Design Considerations
Aspect: How command history stores input:
Alternative 1 (current choice): Maintain a list of command strings and navigate via an index.
- Pros: Simple, lightweight and easy to integrate with UI navigation (UP/DOWN keys).
- Cons: Only stores raw strings, so it cannot preserve command execution context.
Alternative 2: Store command objects with full state.
- Pros: Could enable richer functionality
- Cons: More complex, higher memory usage, unnecessary for typical command history navigation.
Since the goal is shell-like navigation, storing only strings is sufficient and keeps the implementation simple.
Aspect: How navigation handles partially typed input:
Alternative 1 (current choice): Preserve the current input as a “draft” when the user navigates through history.
- Pros: More UX-friendly, as user can return to unfinished input after scrolling through history.
- Cons: Slight increase in code complexity to manage a separate draftCommandText.
Alternative 2: Ignore partially typed input and always replace with history.
- Pros: Simpler, no need for a draft variable.
- Cons: User loses in-progress typing when navigating, which is frustrating in practice.
Preserving draft input improves user experience and is easy to implement with minimal overhead.
Data Archiving Feature
Implementation
The archive feature allows both vendor contacts and products to be hidden from the main lists without permanently deleting them. Archived records remain stored in the system and can be restored at any time.
The feature introduces four commands:
archive EMAIL                 — archives a vendor contact
restore [EMAIL]               — restores an archived vendor; lists all archived vendors if no email given
archiveproduct IDENTIFIER     — archives a product
restoreproduct [IDENTIFIER]   — restores an archived product; lists all archived products if no identifier given
Vendor archiving — Person uses a tag-based approach: isArchived() checks whether the person's tag set contains an "archived" tag. Person#archive() returns a new Person with the tag added; Person#restore() returns a new Person with the tag removed.
Product archiving — Product uses a dedicated boolean isArchived field. Product#archive() and Product#restore() return new instances with the flag toggled accordingly.
Both sets of operations are exposed through the Model interface:
Model#archivePerson(Person person)
Model#restorePerson(Person person)
Model#archiveProduct(Product product)
Model#restoreProduct(Product product)
The ModelManager implementations call addressBook.setPerson() and inventory.setProduct() respectively to swap the old record for the newly created immutable copy.
Usage Scenario
Given below is an example of the vendor archive/restore lifecycle.
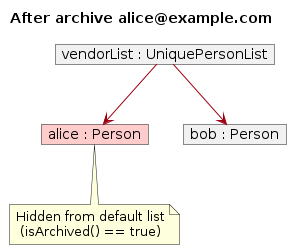
Step 1. The vendor list contains two active vendors, Alice and Bob.
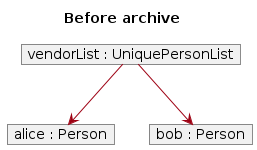
Step 2. The user executes archive alice@example.com. Alice's Person object is replaced with a copy that has the "archived" tag added. Because the active filtered list excludes archived persons, Alice disappears from the main view.
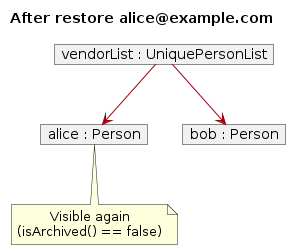
Step 3. The user executes restore alice@example.com. Alice's Person object is replaced with a copy that has the "archived" tag removed. She reappears in the main list.
archiveproduct / restoreproduct follow the same lifecycle as described above, operating on Product objects in the Inventory instead of Person objects in the AddressBook.
The sequence diagram below shows the interactions within the Logic component when archive support@adafruit.com is executed:
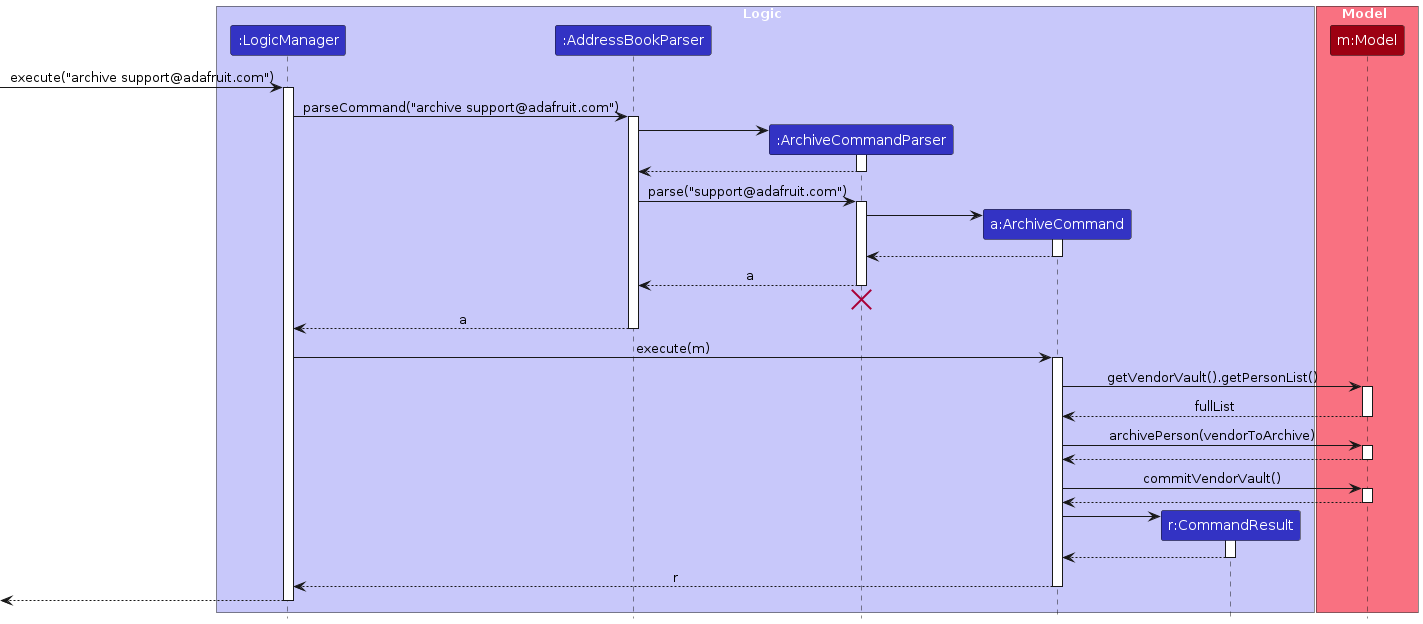
Note: The lifeline for ArchiveCommandParser should end at the destroy marker (X) but due to a limitation of PlantUML, the lifeline continues till the end of the diagram.
The sequence diagram below shows the interactions for restore support@adafruit.com:
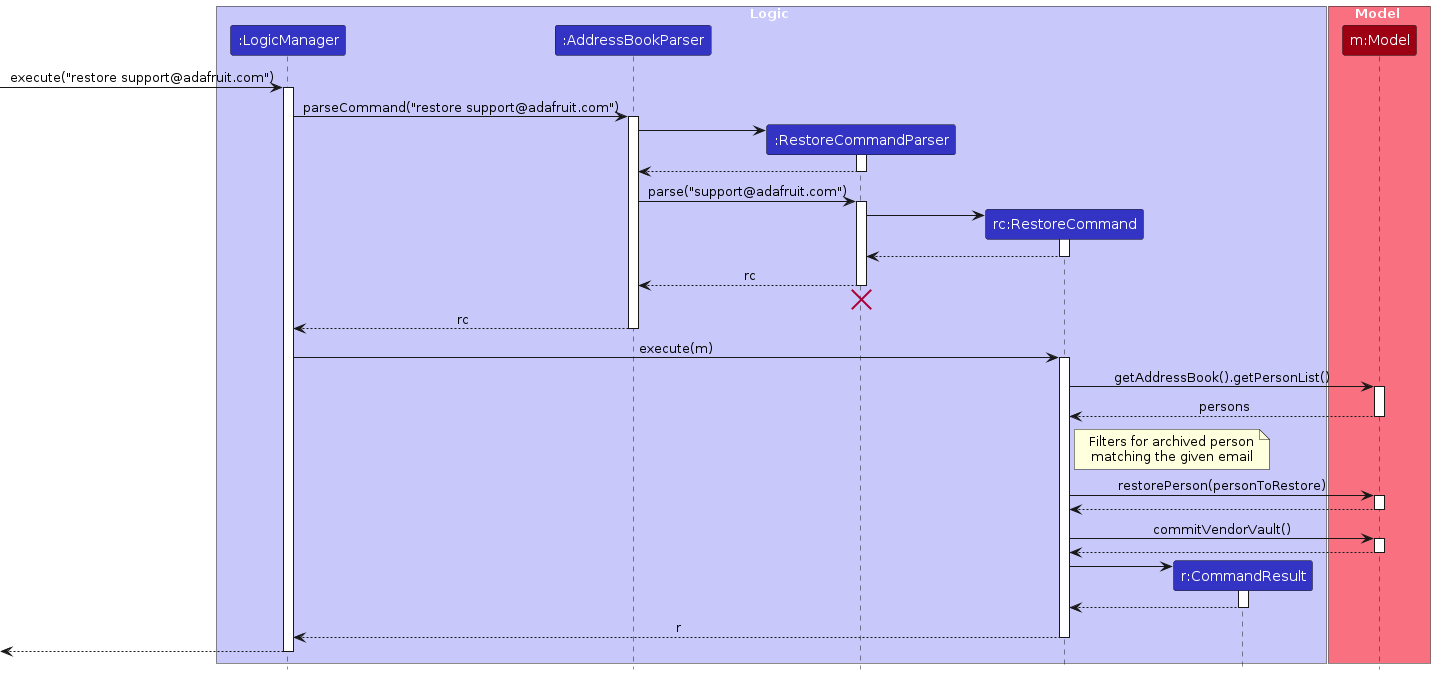
Note: The lifeline for RestoreCommandParser should end at the destroy marker (X) but due to a limitation of PlantUML, the lifeline continues till the end of the diagram.
Similarly, how an archive operation goes through the Model component is shown below:

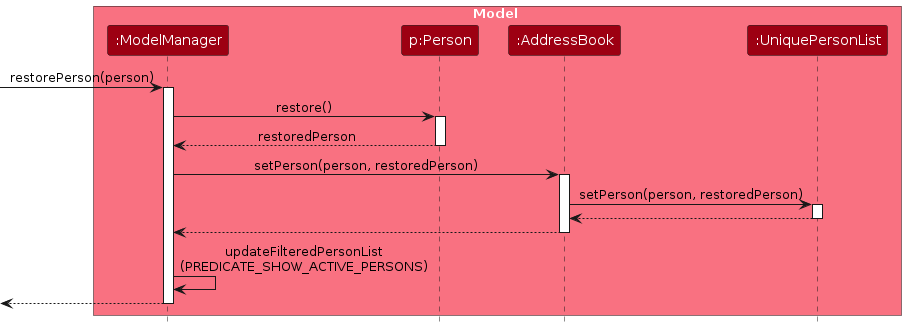
Similarly, how a restore operation goes through the Model component is shown below:
In full, the steps for archive support@adafruit.com are:
AddressBookParseridentifies the command wordarchive.ArchiveCommandParserparses the email argument.- An
ArchiveCommandobject is created. LogicManagerexecutes the command.- The command searches the full
VendorVaultperson list (not just the filtered list) for the matching email. Model#archivePerson()is called, replacing thePersonwith an archived copy viaPerson#archive().Model#commitVendorVault()is called to save the state for undo/redo.- The UI updates automatically because archived vendors are excluded from the active filtered list.
The restore EMAIL command follows a similar flow: it searches only the archived subset of persons, calls Model#restorePerson(), then commits. If no email is provided (or the email is not found), the filtered list is switched to show only archived vendors as a convenience.
archiveproduct IDENTIFIER and restoreproduct IDENTIFIER mirror this flow against the Inventory, using Model#archiveProduct() / Model#restoreProduct().
The model also maintains two constant predicates:
PREDICATE_SHOW_ACTIVE_PERSONS  = person  -> !person.isArchived()
PREDICATE_SHOW_ACTIVE_PRODUCTS = product -> !product.isArchived()
These are applied by default so that archived records are hidden from the main display. When restore (without an argument) or restoreproduct (without an identifier or with an unknown identifier) is executed, updateFilteredPersonList(Person::isArchived) or updateFilteredProductList(Product::isArchived) is called temporarily to surface the archived records as a guide to the user.
Design Considerations
Aspect: Representation of archived vendors (Person)
Alternative 1 (current choice): Use a special
"archived"tag in the existingTagset.- Pros: No schema change; archived status is persisted through the existing JSON tag serialisation without any additional storage field.
- Cons: The archived flag is semantically different from user-defined tags; mixing them can be confusing and requires care when displaying or editing tags.
Alternative 2: Add a dedicated
boolean isArchivedfield toPerson(same approach used byProduct).- Pros: Cleaner semantics; no risk of the user accidentally adding/removing the reserved tag.
- Cons: Requires a storage migration and changes to
JsonAdaptedPerson.
Alternative 1 was chosen for Person to minimise changes to the existing architecture. A future refactor may unify both approaches.
Aspect: Representation of archived products (Product)
Alternative 1 (current choice): Dedicated
boolean isArchivedfield.- Pros: Clean separation; the field is explicit in the constructor and persisted via
JsonAdaptedProduct. - Cons: Slightly more verbose constructors.
- Pros: Clean separation; the field is explicit in the constructor and persisted via
Alternative 2: Reuse a tag (same approach as
Person).- Cons: Products do not otherwise use tags, so this would be inconsistent.
Alternative 1 was chosen as Product has no pre-existing tag mechanism to reuse.
Command Alias Feature
Implementation
The command alias feature allows users to define shorthand strings that map to existing command words.
When a user enters a command, the input is resolved against the stored alias mappings before being parsed and executed.
The core data structures are:
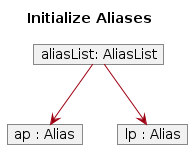
Alias— An immutable value object holding analiasstring and itsoriginalCommandstring.AliasList— Stores a list ofAliasobjects, enforces uniqueness of alias string, and exposes lookup, add and remove operations.Aliases— The top level model object that wrapsAliasList. It implementsReadOnlyAliases.
These operations are exposed in Model interface as Model#addAlias(), Model#findAlias(), Model#removeAlias().
Alias Resolution is handled in AddressBookParser.
Before converting any command to its specific parser, the parser checks if the command word entered by the user matches any stored alias.
If a match is found, the alias is substituted with its original command word, and parsing continues as normal.
Otherwise, the input is used as it is.
Usage Scenario
Given below is an example usage scenario and how the alias feature behaves an each step.
Step 1. The user launches the application. The Aliases object is initialised and loaded from aliases.json via AliasStorage
Note: If the file does not exist, an empty AliasList is used
Step 2. The user executes alias list ls. An AliasCommand is created with originalCommand = "list" and alias = "ls".
The new Alias is stored in Aliases and persisted to aliases.json

Note: If the alias string "ls" already existed in AliasList, a DuplicateAliasException is thrown and the command fails with an error message.
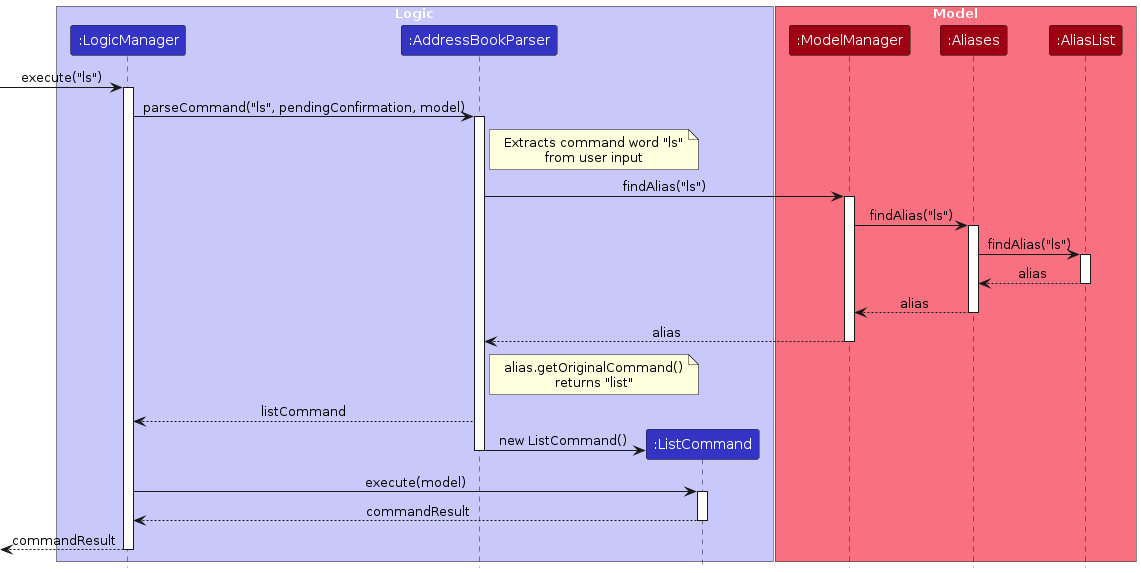
Step 3. The user types ls. The AddressBookParser checks the command word "ls" against the stored aliases and finds a match. "ls" is mapped to "list".
The command word is substituted, and the rest of execution proceeds identically to if the user had typed "list" directly.
Step 4. The user types ls args. The same substitution occurs, only the command word "ls" is replaced with "list", and "args" is passed through unchanged to the underlying parser.
Step 5. The user executes deletealias ls. A DeleteAliasCommand is created and removes "ls" from Aliases.
The updated alias list is persisted to aliases.json.
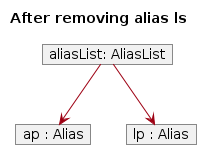
Note: If "ls" does not exists in AliasList, a NoAliasFoundInAliasListException is thrown and the command fails with an error message.
The following sequence diagram shows how the user input ls is resolved through AddressBookParser and Aliases:
Design Considerations
Aspect: Where alias resolution happens
Alternative 1 (current choice): Resolves aliases in
AddressBookParserbefore parsing it to the correct command.- Pros: Centralised, as all commands automatically benefit from aliasing without any per-command changes
- Cons: The parser needs access to the
Model
Alternative 2: Resolve aliases in
LogicManagerbefore passing the input to the parser.- Pros: Keeps parser free of
Modeldependencies. - Cons: Require
LogicManagerto be aware of alias resolution logic, making the code more complex.
- Pros: Keeps parser free of
Alternative 1 is preferred as it keeps all parsing logic in one place.
Aspect: Persistence strategy
Alternative 1 (current choice): Store aliases in a separate
aliases.jsonfile viaAliasStorage.- Pros: Clean separation from contact and product data. Easy to back up or reset independently
- Cons: Adds another file the user must manage when transferring data.
Alternative 2: Embed alias data inside
addressbook.json.- Pros: Use the same code to embed data as contacts.
- Cons: Couples unrelated data, making the file harder to read and maintain.
Alternative 1 aligns with the existing storage pattern used by contacts and inventory.
Better Search Feature
Implementation
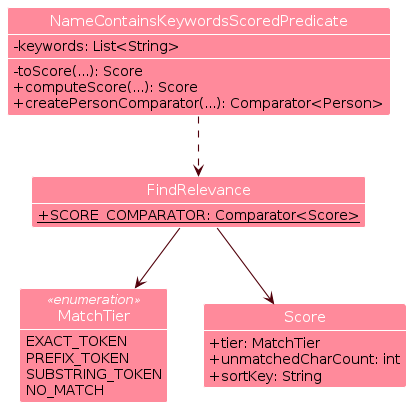
This feature upgrades contact/product search to use partial matching and show matches by relevance. It is implemented through a match predicate and shared ranking contract:
NameContainsKeywordsScoredPredicatetests if a contact's name matches any keyword using partial matching. The name is split and processed as tokens.toScore(String token, String keyword, String fullName)checks each keyword against each token in the name to determine a score.computeScore(Person person)returns the best score among all keyword-token pairs usingSCORE_COMPARATOR.createPersonComparator()returns a comparator that ranks contacts by their score.
The same applies for
ProductNameContainsKeywordsScoredPredicate.RelevanceRankdefines the ranking contract.- Keyword-token matches are tiered:
EXACT_TOKEN>PREFIX_TOKEN>SUBSTRING_TOKEN>NO_MATCH. Score(MatchTier tier, int unmatchedCharCount, String sortKey)represents how relevant a match is.SCORE_COMPARATORimplements score comparison.
- Keyword-token matches are tiered:
This diagram shows the structure and dependency of Better Search classes:
This diagram shows an example of scoring state when the given keyword is "adafruit":
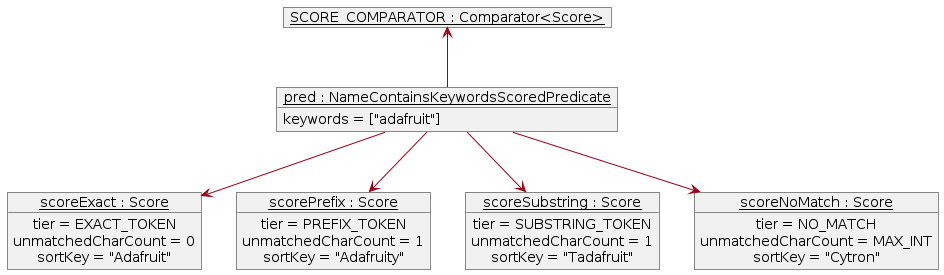
SCORE_COMPARATOR compares scores in this order: tier, unmatchedCharCount, sortKey (alphabetical). This
gives the ranking: "Adafruit", "Adafruity", "Tadafruit", "Cytron".
Usage Scenario
Here's how Better Search is executed by the find command:
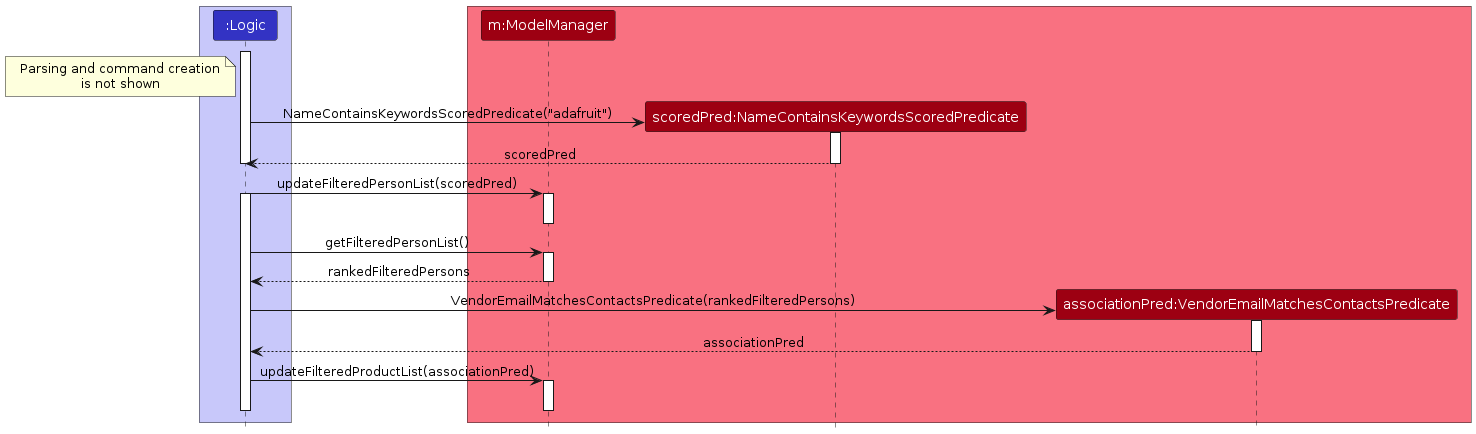
Step 1. FindCommandParser creates a FindCommand with a NameContainsKeywordsScoredPredicate.
Step 2. FindCommand calls ModelManager#updateFilteredPersonList to use the predicate.
Step 3. FindCommand then creates a VendorEmailMatchesContactsPredicate, using it to call
ModelManager#updateFilteredProductList.
These updates trigger UI to display matching contacts and their products.
This diagram shows the interactions between Logic and Model:
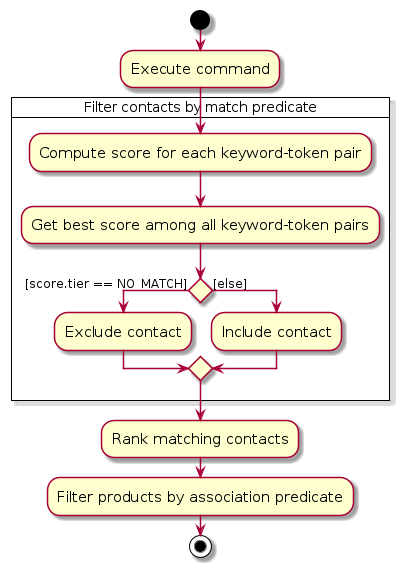
This diagram summarises the decision flow in Model:
The usage scenario for findproduct is analogous.
Design Considerations
Aspect: Matching strategy
Alternative 1 (current choice): Partial matching
- Pros: Tolerant of incomplete keywords, hence more user-friendly.
- Cons: Broader set of results.
Alternative 2: Exact matching
- Pros: Simpler design; Stricter set of results.
- Cons: Low usability as users have to remember exact words.
Alternative 1 was chosen to ensure discoverability and improve user experience.
Aspect: Ranking implementation
Alternative 1 (current choice): Shared contract between contact and product entities.
- Pros: Consistent behavior across commands; Reusable implementation.
- Cons: Careful abstraction required.
Alternative 2: Independent logic per entity.
- Pros: Each entity can customise the logic.
- Cons: Duplicated logic; Higher risk of behavior drift.
Alternative 1 was chosen for consistency and maintainability.
Documentation, logging, testing, configuration, dev-ops
Appendix: Requirements
Product scope
Target user profile:
Small business owners who:
- Have many vendors' contacts and inventory to manage
- Are tech-savvy and prefers CLI over GUI
Value proposition:
VendorVault helps small business owners seamlessly manage vendor contacts and track inventory in one simple system. By flagging and sorting low-quantity products, owners instantly know what needs restocking and who to contact, enabling timely action without relying on complex or costly inventory tools.
User stories
Priorities: High (must have) - * * *, Medium (nice to have) - * *, Low (unlikely to have) - *
| Priority | As a … | I want to … | So that I can … |
|---|---|---|---|
* * | new user | see usage guide | recap and learn commands |
* * * | user | add a new contact | add new vendors I work with |
* * | user | edit an existing contact | keep vendor information up to date |
* * * | user | delete a contact | remove vendors I no longer work with |
* * * | user | view contacts | |
* * | user | find a contact by name | locate their details without having to go through the entire list |
* | user | sort contacts by name | browse them easily |
* * | user | clear all contacts | reset my vendor list |
* * * | user | add a product | add new products I sell |
* * | user | edit an existing product | keep product information up to date |
* * * | user | delete a product | remove products I no longer sell |
* * * | user | view products | |
* * | user | find a product by name | locate their details without having to go through the entire list |
* | user | sort products by name/identifier | browse them easily |
* * | user | clear all products | reset my inventory |
* * | user | view inventory statistics | understand my product quantity levels |
* * | user | undo changes I made | easily revert and correct mistake |
* * | user | redo changes I made | easily reapply changes I accidentally undid |
* * | user | navigate my previous commands | reuse or correct recent commands without providing them again |
* * | expert user | add alias for commands | create alias for long commands according to my preferences |
* * | expert user | delete alias for commands | remove alias for I no longer want to use |
* * | expert user | view aliases for commands | view all aliases that I have set |
Use cases
(For all use cases below, the System is the VendorVault application, referred to as VV and the Actor is the User, unless specified otherwise)
Use case: UC1 - Add a Vendor Contact
Preconditions: Application is running, user is on the main screen.
MSS
- User chooses to add a vendor contact and provides required fields.
- VV validates the command format and fields, then adds the contact and displays the list of vendor contacts.
Use case ends.
Extensions
1a. VV detects invalid command format
- 1a1. VV rejects the command and displays an error message indicating the correct format with an example.
- 1a2. User re-enters the corrected command.
Steps 1a1–1a2 are repeated until the command format is valid.
Use case resumes from step 1.
1b. VV detects error in fields provided
1b1. VV rejects the command and displays validation error message.
1b2. User re-enters the corrected fields.
Steps 1b1–1b2 are repeated until the fields are valid.
Use case resumes from step 1.
1c. VV detects duplicate contact
1c1. VV rejects the command and displays a duplicate contact error message.
1c2. User re-enters the corrected fields.
Steps 1c1–1c2 are repeated until the fields are not a duplicate.
Use case resumes from step 1.
1d. VV detects potential duplicate contact
1d1. VV accepts the command and displays a warning with details of the similar contact.
Use case resumes from step 2.
1e. VV detects potential input mistake
1e1. VV accepts the command displays a warning indicating the input may be unintended.
Use case resumes from step 2.
Use case: UC2 - Edit a Vendor Contact
Preconditions: Application is running, user is on the main screen.
MSS
- User chooses to edit a vendor contact and provides fields they would like to update.
- VV validates the command format and fields, then edits the contact and displays the list of vendor contacts.
Use case ends.
Extensions
*a. All extensions that apply to UC1: Add a Vendor Contact also apply here.
1f. VV detects that the operation removes all tags.
1f1. VV requests confirmation.
1f2. User confirms the deletion.
Use case resumes from step 2.
1f2a. User cancels the deletion instead.
1f2a1. VV aborts the edit operation and displays a cancellation message.
Use case ends.
Use Case: UC3 - View Vendor Contacts
Preconditions: Application is running, user is on the main screen.
MSS
- User chooses to view all vendor contacts.
- VV shows all vendor contacts.
Use case ends.
Use case: UC3 - Delete Vendor Contact
Preconditions: Application is running, user is on the main screen and has added a contact.
MSS
- User chooses to delete a contact.
- VV requests for confirmation for deleting the contact.
- User confirms deletion.
- VV deletes contact and displays a list of current contacts.
Use case ends.
Extensions
2a. User decides not to delete the contact, rejecting the deletion.
- 2a1. VV displays a list of current vendor contacts.
Use case ends.
Use case: UC4 - Find Vendor Contact
Preconditions: Application is running, user is on the main screen and has added a contact.
MSS
- User chooses to find a vendor contact by entering one or more keywords.
- VV searches vendor contacts using the provided keyword(s).
- VV displays the matching vendor contacts.
Use case ends.
Extensions
1a. User provides no keyword.
- 1a1. VV displays an error indicating missing keywords.
Use case ends.
Use Case: UC5 - Add Product
Preconditions: Application is running, user is on the main screen.
MSS
- User enters data to add a Product.
- VV validates the input data.
- VV checks that the product does not already exist.
- VV creates the product.
- VV adds the product to the inventory.
- VV saves the updated inventory to storage.
- VV displays a success message.
Use case ends.
Extensions
2a. VV detects error in provided data (e.g. missing compulsory fields, invalid data format).
- 2a1. VV displays an appropriate error message indicating the invalid or missing field.
- 2a2. User re-provides the corrected data.
Steps 2a1–2a2 are repeated until all fields are valid.
Use case resumes from step 4.
3a. VV detects duplicate product.
- 3a1. VV displays an error.
- 3a2. User re-provides the corrected data.
Steps 3a1–3a2 are repeated until a unique ID is provided.
Use case resumes from step 5.
6a. Storage file cannot be written or accessed.
- 6a1. VV displays an error indicating inventory could not be saved.
Use case ends.
Use Case: UC6 - View Products
Preconditions: Application is running, user is on the main screen.
MSS
- User chooses to view all products.
- VV shows all products.
Use case ends.
Use case: UC7 - Delete Product
Preconditions: Application is running, user is on the main screen and has added a product.
MSS
- User chooses to delete a product.
- VV requests for confirmation for deleting the product.
- User confirms deletion.
- VV deletes product and displays list of current product.
Use case ends.
Extensions
2a. User decides not to delete the product, rejecting deletion.
- 2a1. VV displays a list of current product.
Use case ends.
Use case: UC8 - Find Product
Analogous to UC4.
Use case: UC9 - Undo/Redo a Change
Preconditions: Application is running, user is on the main screen, and at least one undoable action has been performed in the current session.
MSS
- User chooses to undo the last change.
- VV reverts the last change and displays a success message indicating what was undone.
- User chooses to redo the undone change.
- VV reapplies the change and displays a success message indicating what was redone.
Use case ends.
Extensions
1a. VV detects that no undoable actions exist in the current session.
1a1. VV displays an error message indicating there is nothing to undo.
Use case ends.
2b. User performs a new undoable action after undoing a previous action.
2b1. VV clears the redo history.
2b2. The new action becomes the latest undoable action.
Use case ends.
3a. VV detects that no redoable actions exist (e.g. redo history was cleared, or no undo was performed).
3a1. VV displays an error message indicating there is nothing to redo.
Use case ends.
Use case: UC10 - Navigate Command History
Preconditions: Application is running, user is on the main screen.
MSS
- User has a partial unsent command and chooses to go to previous command.
- VV saves the current input as a draft and displays the previous command.
- User chooses to go to next command.
- VV displays the next command.
- User navigates back to the most recent command.
- VV restores the saved draft.
Use case ends.
Extensions
*a. VV detects that no command history exists (no commands have been entered in this session).
*a1. VV does nothing.
Use case ends.
1a. User is already at the oldest command in the history.
1a1. VV does nothing.
Use case resumes from step 2.
3a. User is already at the most recent command in the history.
3a1. VV does nothing.
Use case resumes from step 4.
Non-Functional Requirements
Usability:
- The system shall use consistent command formats and prefixes across all features.
Reliability:
- The system shall not lose existing data when an invalid command is entered.
- The system should respond to invalid commands and inputs with clear errors and/or appropriate warnings.
Portability:
- The system shall run on Windows, Mac and Linux as long as it has Java
17or above installed.
Performance:
- The system shall respond to any valid command within 2 seconds when the total number of entries does not exceed expected usage limits (1,000 vendors contacts and 5,000 products).
Persistence:
- The system must save app data locally as JSON and load it when launched.
Documentation:
- The system should provide a developer guide for future contributors, code accompanied by Javadoc comments and a user guide for users.
Security:
- The system should store data locally on the user’s device and should not transmit data over any network.
Scalability and Capacity:
- The system should handle at least 1,000 vendor contacts and 5,000 products (performance beyond these limits is not guaranteed).
Maintainability:
- The system shall separate Logic, Model, Storage and UI components to support future expansion.
- The contact management and inventory management components should be separated such that changes in one do not require changes in the other, except through well-defined interfaces.
Testability:
- At least 75% of the source code should be covered by tests.
Accessibility:
- The system should allow users to complete all core tasks using commands without requiring mouse interaction.
- A user with above average typing speed for regular English text (i.e. not code, not system admin commands) should be able to accomplish most of the tasks faster using commands than using the mouse.
Glossary
- Mainstream OS: Windows, Linux, MacOS
- Contact/Vendor Contact: A stored record containing a vendor’s name, phone number, email, address, and optional tags.
- Inventory: The system that holds a set of products
- Product: An entry to the inventory; contains the product's identifier, name, quantity, restock threshold and email of associated vendor.
- Product Identifier: A string that uniquely identifies a product
- Command: A user input instruction entered into the CLI to perform an action (e.g. add, delete, list).
- Prefix: A keyword used to identify parameters in a command (e.g. n/, p/, e/, q/).
Appendix: Instructions for manual testing
Launch and shutdown
Initial launch as per Quick Start
- Expected: Full-screen GUI with sample contacts and products.
Saving window preferences
Resize the window as desired. Move the window to a different location. Close the window.
Re-launch app. Expected: The most recent window size and location is retained.
Adding a contact
Prerequisites: There should be no contact with email
support@adafruit.com.Test case:
add n/Adafruit Industries p/64601234 e/support@adafruit.com a/151 Varick St, New York, NY 10013, USA- Expected: Adafruit Industries's Contact is added.
Test case:
add- Expected:
Invalid Command Format..error.
- Expected:
Test case
add e/support@adafruit.com- Expected:
Missing required field(s): n/ (name), p/ (phone), a/ (address)error.
- Expected:
Test case
add n/Adafruit p/64601234 e/support@adafruit.com a/USA- Prerequisites: A contact with
support@adafruit.comhas been previously added. - Expected:
This vendor contact already exists with the same email (name: Adafruit Industries, email: support@adafruit.com).
- Prerequisites: A contact with
Editing a contact
Prerequisites: There should be a contact with the email
support@adafruit.comwith an address different fromNew York, USAand no contact with emailsg.sales@cytron.io.Test case:
edit support@adafruit.com a/New York, USA- Expected: Address updates to
New York, USA.
- Expected: Address updates to
Test case:
edit support@adafruit.com e/- Expected:
Email should not be blankerror.
- Expected:
Test case:
edit sg.sales@cytron.io a/USA- Expected:
No contact with the specified email was founderror.
- Expected:
Test case:
edit support@adafruit.com- Expected:
At least one field to edit must be providederror.
- Expected:
Deleting a contact
Prerequisites: There should be 2 contacts with the emails
support@adafruit.comandsales@techsource.com.Test case:
delete support@adafruit.com- Expected: A confirmation prompt appears. Enter
yto confirm and delete the matching contact.
- Expected: A confirmation prompt appears. Enter
Test case:
delete -y sales@techsource.com- Expected: Matching contact is deleted without a confirmation prompt.
Test case:
delete notfound@example.com- Prerequisites: There is no contact with email
notfound@example.com. - Expected:
No contact with the specified email was founderror.
- Prerequisites: There is no contact with email
Test case:
delete- Expected:
Invalid Command Format..error.
- Expected:
Finding a contact
Prerequisites: There should be a contact named Adafruit Industries
Test case:
find- Expected:
Invalid command format! …error
- Expected:
Test case:
find ada- Expected: Contact named Adafruit Industries is listed
Clearing all contacts
Prerequisites: There should be multiple contacts in the system. (You can verify with
list)Test case:
clear- Expected: A confirmation prompt appears. Enter
yto confirm and clear all contacts.
- Expected: A confirmation prompt appears. Enter
Test case:
clear -y- Expected: All contacts are removed from the contact list.
Adding a product
Prerequisites: There should be a contact with email
support@adafruit.comTest case:
addproduct id/SKU-1003 n/Arduino Uno R4 q/50 th/10 e/support@adafruit.com- Expected: Product with the above details is added
Test case:
addproduct id/SKU-288- Expected:
Missing required field(s): n/ (product name)error
- Expected:
Test case:
addproduct id/SKU-1003 n/HP LaserJet (M428fdw) q/17 th/15 e/support@adafruit.com- Expected:
This product already exists with the same identifier.error
- Expected:
Test case:
addproduct id/SKU-1004 n/HP LaserJet (M428fdw) q/17 th/15 e/sg.sales@cytron.io- Expected:
Vendor email sg.sales@cytron.io does not match any existing contact.error
- Expected:
Deleting a product
Prerequisites: There should be 2 product with ids
SKU-1001andSKU-1002in product listTest case:
deleteproduct SKU-1001- Expected: A confirmation prompt appears. Enter
yto confirm and delete the matching product.
- Expected: A confirmation prompt appears. Enter
Test case:
deleteproduct -y SKU-1002- Expected: Matching product is deleted without a confirmation prompt.
Test case:
deleteproduct NoValidIdentifier- Prerequisites: There is no product with identifier
NoValidIdentifier. - Expected:
No product found with the specified identifiererror.
- Prerequisites: There is no product with identifier
Test case:
deleteproduct- Expected:
Invalid Command Format..error.
- Expected:
Finding a product
Prerequisites: There should be a product named Arduino Uno R4
Test case:
findproduct- Expected:
Invalid command format! …
- Expected:
Test case:
findproduct uno- Expected: Product named Arduino Uno R4 is listed
Clearing all products
Prerequisites: There should be multiple products in the system. (You can verify with
listproduct)Test case:
clearproduct- Expected: A confirmation prompt appears. Enter
yto confirm and clear all products.
- Expected: A confirmation prompt appears. Enter
Test case:
clearproduct -y- Expected: All products are removed from the product list.
Changing default threshold
Prerequisites: None
Test case:
threshold- Expected:
Invalid command format! …
- Expected:
Test case:
threshold 5- Expected:
Default restock threshold set to: 5success
- Expected:
Test case:
addproduct id/DE/5 n/PlayStation q/0 e/sg.sales@cytron.io- Expected: Product added with threshold defaulting to 5
Alias and Delete Alias Commands
Note: Perform these test cases in order within the same app session.
Prerequisites:
lsis not a valid alias.Test case:
alias- Expected: If no aliases exist, a message prompts the user to add aliases. If aliases exist, a list of all aliases is shown.
Test case:
alias list ls- Expected: A new alias
lsis created that maps to thelistcommand. The alias can now be used instead oflist.
- Expected: A new alias
Test case:
deletealias ls- Expected: The alias
lswill be removed.
- Expected: The alias
Test case:
alias command cmd- Expected:
Command does not exists or is not supportederror.
- Expected:
Test case:
alias list- Expected:
Invalid Command Format..error.
- Expected:
Test case:
deletealias- Expected:
Invalid Command Format..error.
- Expected:
Undoing and Redoing Commands
Note: Perform these test cases in order within the same app session.
Prerequisite:
add n/Adafruit Industries p/64601234 e/support@adafruit.com a/151 Varick St, New York, NY 10013, USAand verify contact appears in contact list.Test case:
undoadding a contact- Expected:
Undo successful: Reverted the addition of contact: …and the contact no longer appears in contact list.
- Expected:
Test case:
redoundoing adding a contact- Expected:
Redo successful: Reapplied the addition of contact: …and the contact reappears in contact list.
- Expected:
Prerequisite:
addproduct id/SKU-288 n/HP LaserJet (M428fdw) q/17 th/15and verify product appears in contact list.Test case:
undoadding a product- Expected:
Undo successful: Reverted the addition of product: …and the product no longer appears in product list.
- Expected:
Test case:
redoundoing adding a product- Expected:
Redo successful: Reapplied the addition of product: …and the product reappears in product list.
- Expected:
At the end, run listall and verify both added contact and product are present in the contact and product lists.
Saving data
Prerequisites: App is running
Test case: Run a command that modifies data and restart the app
- Expected: The modified data is saved
Test case: Delete
/data/addressbook.jsonand restart the app- Expected: App initialises sample contact data
Test case: Enter invalid JSON to
/data/inventory.jsonand restart the app
- Expected:
WARNING: Error reading from jsonFileis logged to the terminal and app starts with empty inventory
- Test case: Enter invalid JSON to
/preferences.jsonand restart the app- Expected:
WARNING: Error reading from jsonFile file preferences.jsonlogged to the console and app starts with default preferences
- Expected:
Appendix: Effort
Difficulty & Challenges
While AB3 deals with one entity, our app handles and integrates two distinct entities.
Hard to navigate initially due to the large inherited AB3 codebase and layered architecture.
Required deeper understanding of system design rather than simple feature additions.
Extensive testing needed due to increased system complexity.
Linking contacts and products while ensuring consistent behavior across both domains required careful architectural design.
Consistently ensuring code is tested before merging added overhead to the development workflow.
Effort & Achievements
Higher implementation effort required from us due to more complex scope; each member contributed about 6k LoC
Deepened existing features and created new features that complement them
Overcoming integration challenges to keep code and documentation aligned
Each team member implemented at least 1 complex feature while managing concurrent high-workload modules
Consistently kept up with project progress through regular updates and communication despite competing priorities
Appendix: Planned Enhancements
Team size: 4